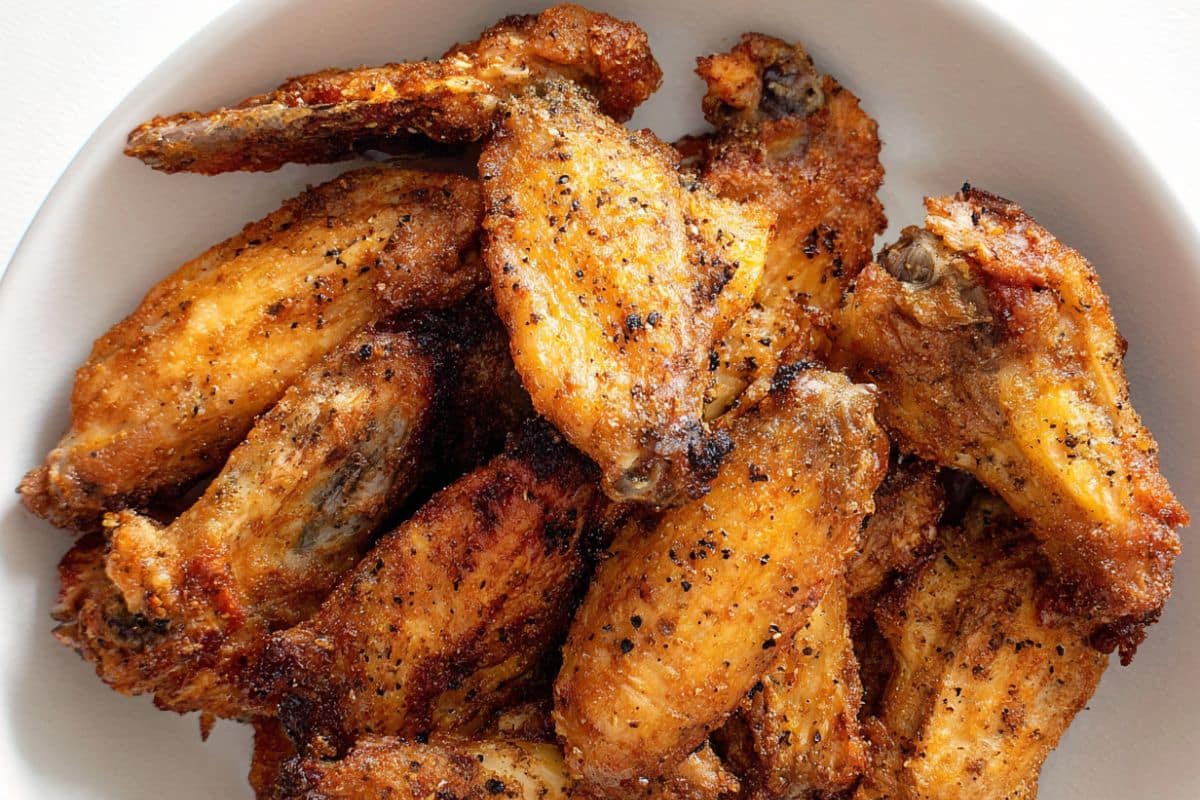
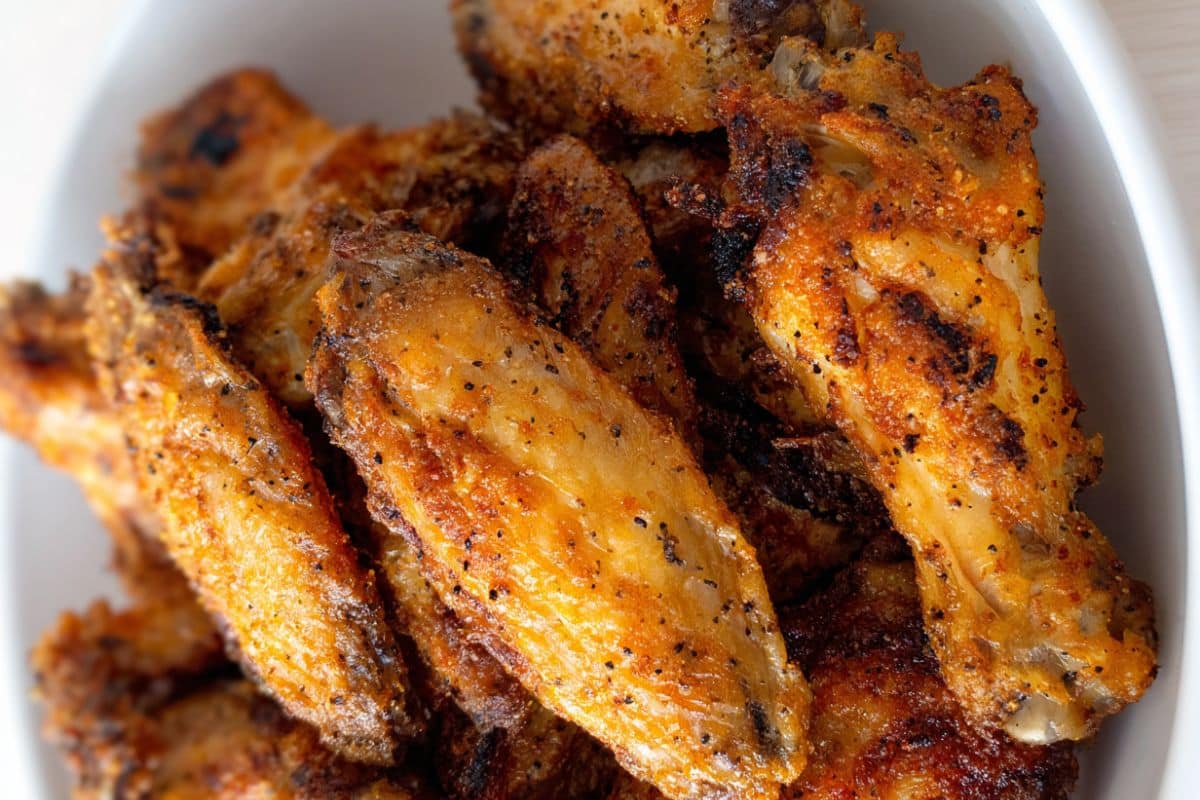
Extra Crispy Baked Chicken Wings
These chicken wings are really easy to make. You need about 10 minutes to prep, a wire rack, and a hot oven. That’s all there is to it. I enjoy making them on game day, but they’re simple enough for a regular Tuesday night dinner too. Serve them as appetizers with your favorite dipping sauce and some celery sticks, and you’ve got a meal everyone will enjoy.
What I also love about this recipe is its flexibility. You can go with classic Buffalo, sweet-and-sticky honey garlic, or smoky BBQ, whatever your family prefers. The base recipe stays the same; only the sauce changes. That makes this one of those go-to recipes you’ll want to make again and again, which is exactly what I like.
Whether you’re cooking for a crowd or just your family, this chicken recipe works well. No mess, no deep fryer, and no stress. Just crispy, juicy chicken wings from your oven. Let’s make them.
Why You’ll Love This Recipe
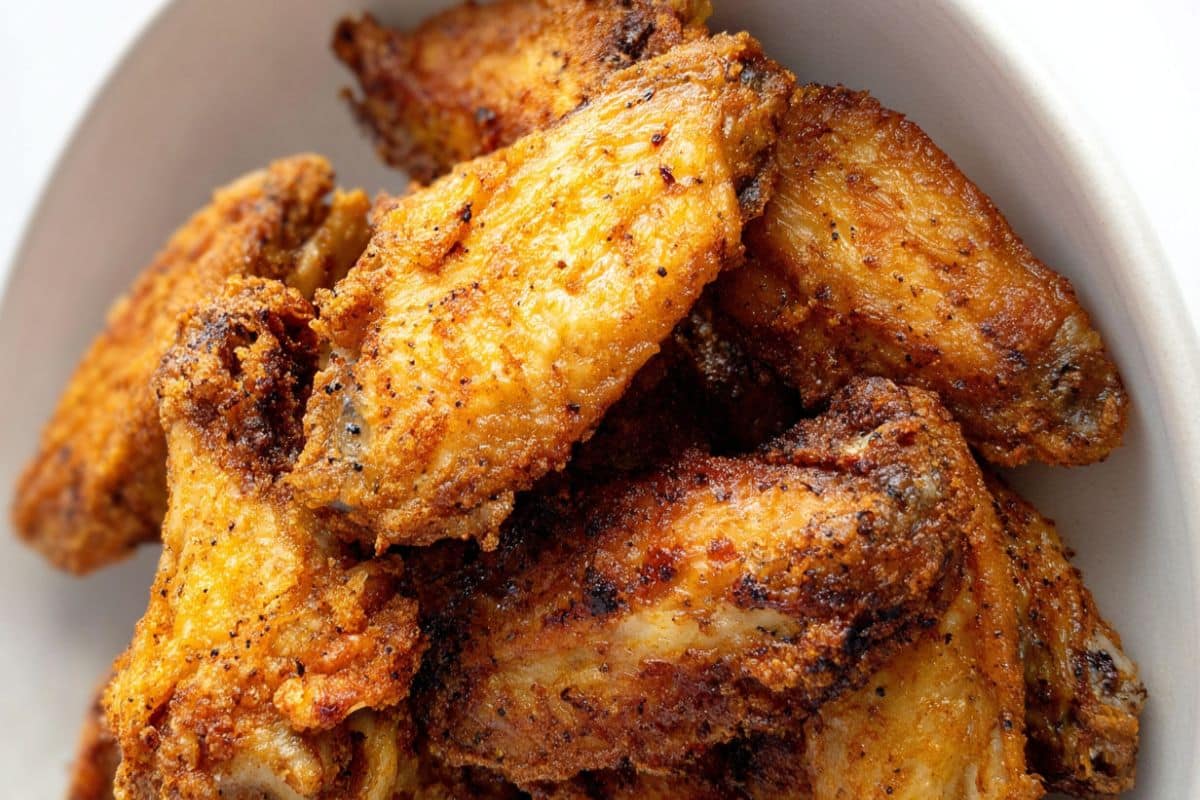
- You’ll get extra crispy skin every time. The baking powder trick actually works. You get real crunch without using oil or a fryer.
- No frying mess. There’s no hot oil, no splatter, and no lingering smell in your kitchen. Just a baking sheet and a wire rack.
- The ingredients are simple and affordable. You probably have everything you need in your kitchen right now.
- There’s minimal hands-on time. Spend just ten minutes on prep, and the oven does the rest. Do other things while they bake.
- This recipe works with any sauce or seasoning. Whether it’s Buffalo, BBQ, honey garlic, or lemon pepper, this base recipe handles them all.
- It’s easy to scale up. If you’re feeding a crowd, just add another baking sheet. The method stays exactly the same.
- It’s cheaper and better than takeout. A full batch of homemade crispy wings costs much less than what you’d pay at a restaurant.
- This recipe is family and crowd approved. Kids love them, adults love them, and they disappear fast every single time.
Ingredient Notes
- Chicken wings. Use whole wings or those already split into flats and drumettes. Fresh or frozen both work. If using frozen, thaw them completely and dry them well before seasoning.
- Baking powder. This is the key ingredient. It pulls moisture out of the skin and helps it crisp up nicely in the oven. Make sure to use baking powder, not baking soda. They are not the same, and baking soda will ruin the flavor. Look for aluminum-free baking powder if you can. It tastes cleaner with no metallic aftertaste.
- Salt helps draw out moisture before baking. I use kosher salt. If you only have table salt, use about half the amount since it’s finer and saltier by volume.
- Garlic powder. It adds a warm, savory depth to every bite. Don’t swap this for fresh garlic. Fresh garlic burns at the high heat needed to crisp the skin.
- Smoked paprika. It gives the wings a nice color and a mild smoky flavor. Sweet paprika works too if that’s what you have on hand.
- Black pepper. Freshly cracked is best, but pre-ground works just fine.
- Oil (optional). A light coating of neutral oil helps the wings brown evenly. Sometimes, I skip it entirely and still get great results.
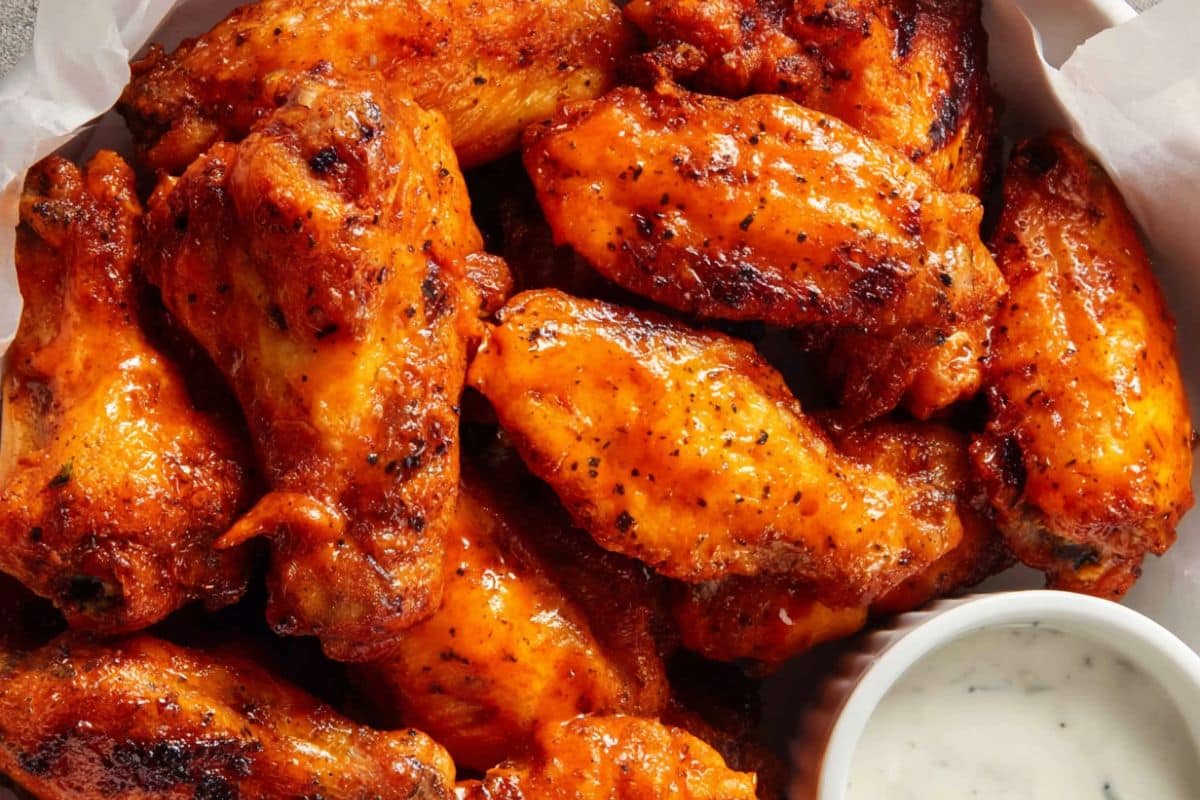
- Your sauce of choice. Buffalo sauce, honey garlic, BBQ or whatever you love. Always toss the wings in sauce after baking, never before. Saucing before baking makes the skin soggy and the sauce burns.
How to Make Baked Chicken Wings
This recipe is easy to follow, consisting of a few simple steps. The process is clear, but a couple of key techniques can turn soggy wings into crispy ones. Here’s what you need to know before you start.
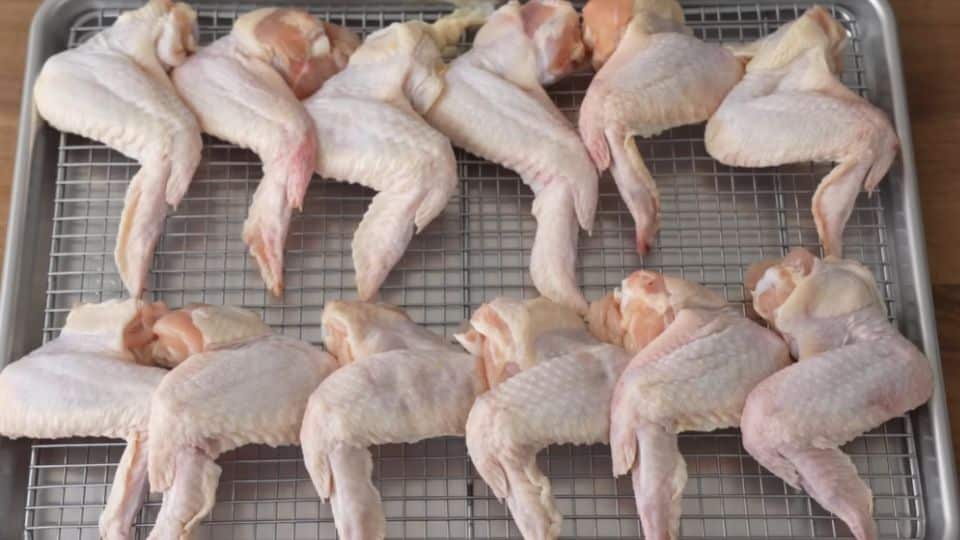
Step 1, Separate whole chicken wings
If using whole chicken pieces like I did, start by separating into flats and drumlets. Its easy process just cut at the joints
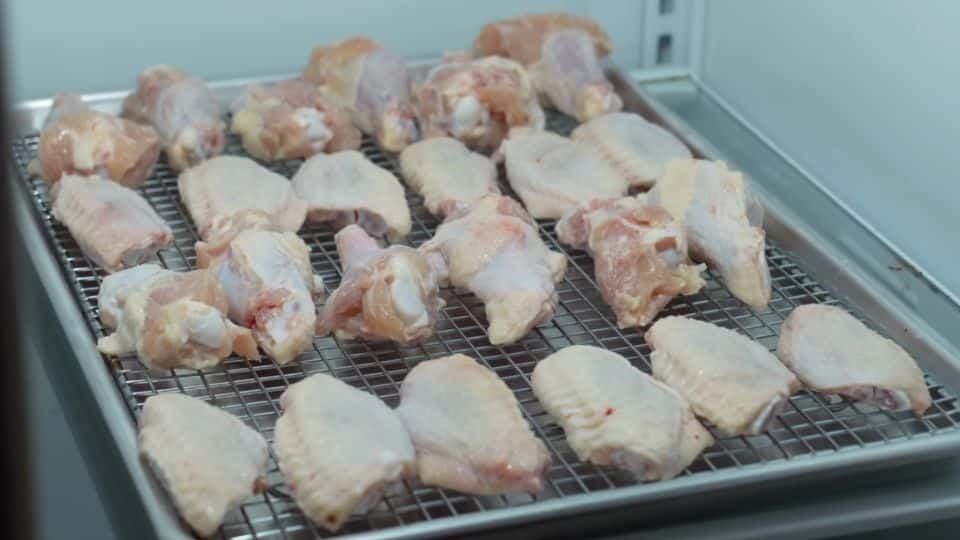
Step 2, Dry the wings thoroughly
Once you have your chicken pieces, pat each wing dry with paper towels. This step is the most important part of the recipe. Moisture will make the skin soggy.

Step 3, Coat with the baking powder mixture
Toss the wings in baking powder, and salt. Ensure every wing is evenly coated. You want a light, even dusting, not a thick layer. Shake off any extra.

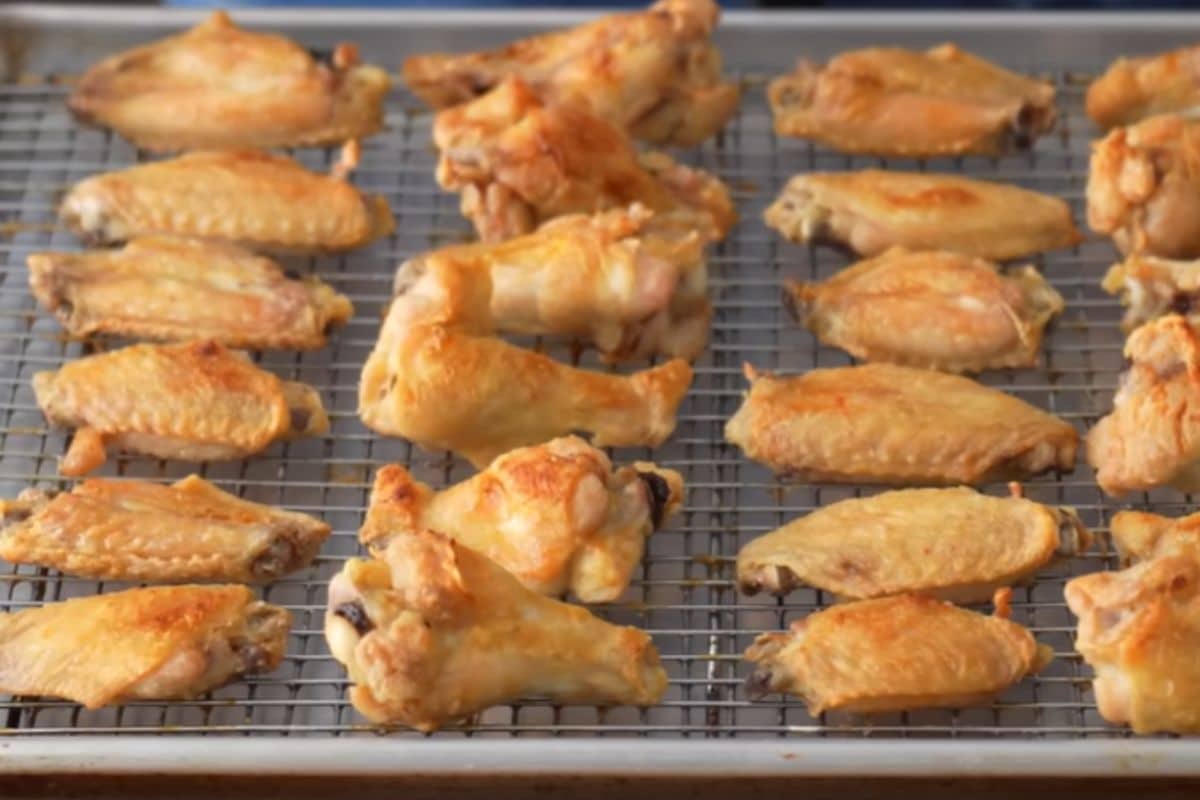
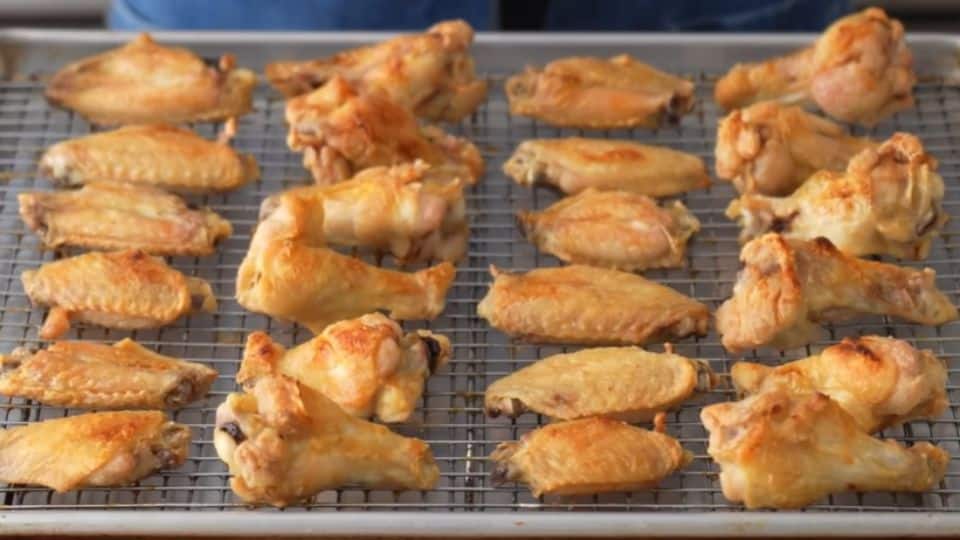
Step 4, Set up your baking rack
Place a wire rack on top of a foil-lined baking sheet. Arrange the wings in a single layer, leaving space between each one. The rack is essential because it lifts the wings off the pan, allowing hot air to circulate underneath. If you skip this, the bottoms will steam instead of crisp.
Step 5, Refrigerate
Place the dried wings on the wire rack and leave them uncovered in the fridge for 1 to 8 hours. Even a 30-minute wait can make a big difference. Don’t skip this step.
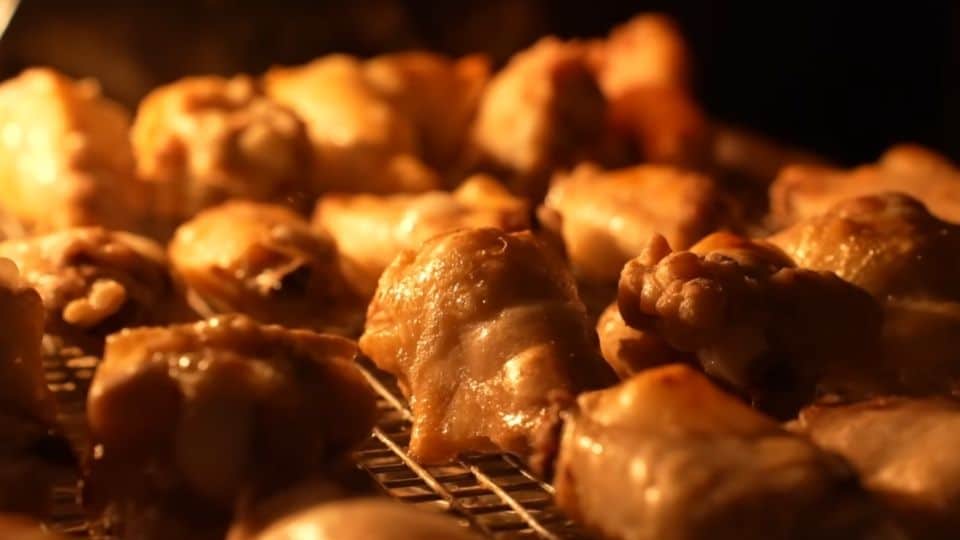
Step 6, Bake low, then high
For extra crispy skin, we are going to use the broiler function. If you’re oven doesn’t have that function just ensure your oven temperate is set between 500°F and 550°F (260°C to 290°C). Because this heat is very intense, place the baking tray at least 8-inches away from the direct heat. This helps render the fat under the skin without burning it.
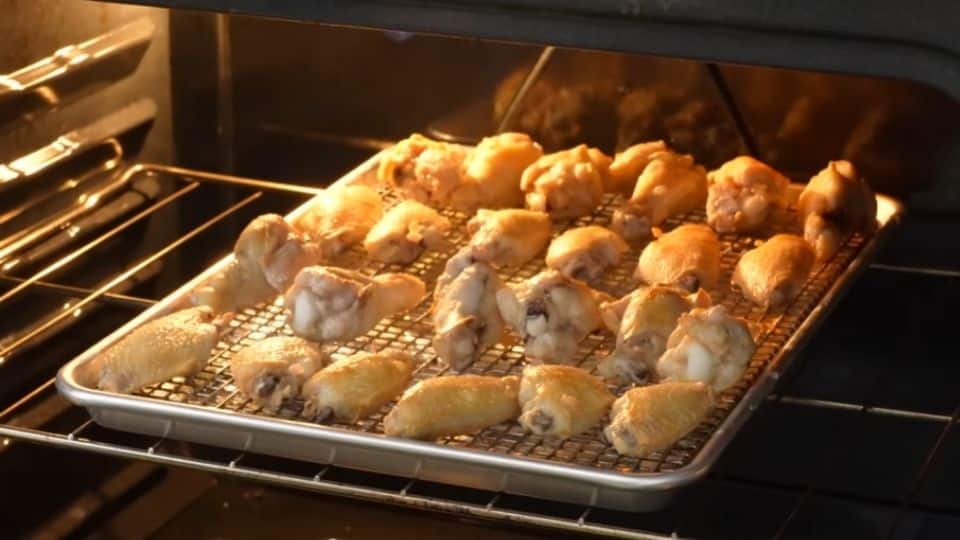
Step 7, Turn every 5-minutes
For that perfectly crispy chicken wings, turn your chicken wings every 5-minutes thought the 20-minute cooking process. That means 4-turns for extra crispy evenly browned chicken wings.
Once done, take the wings out of the oven and
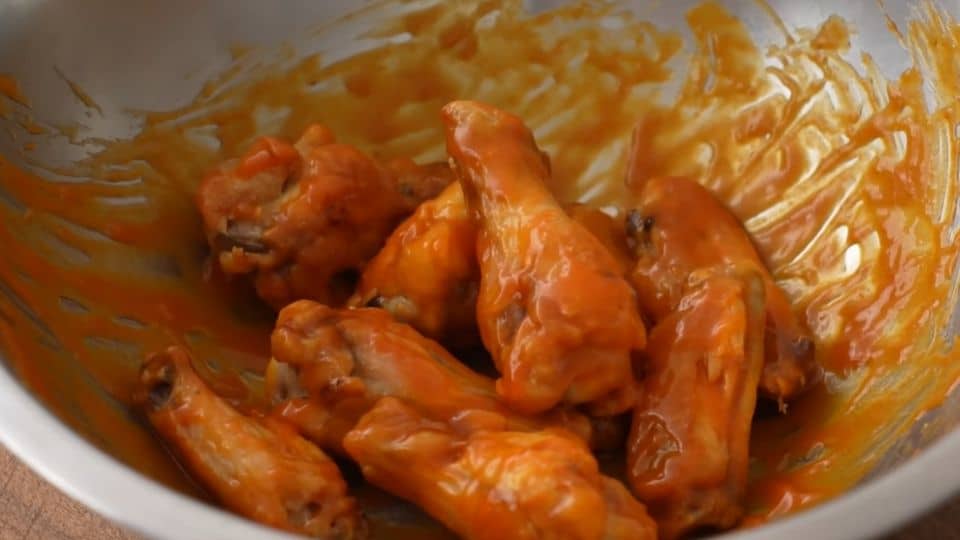
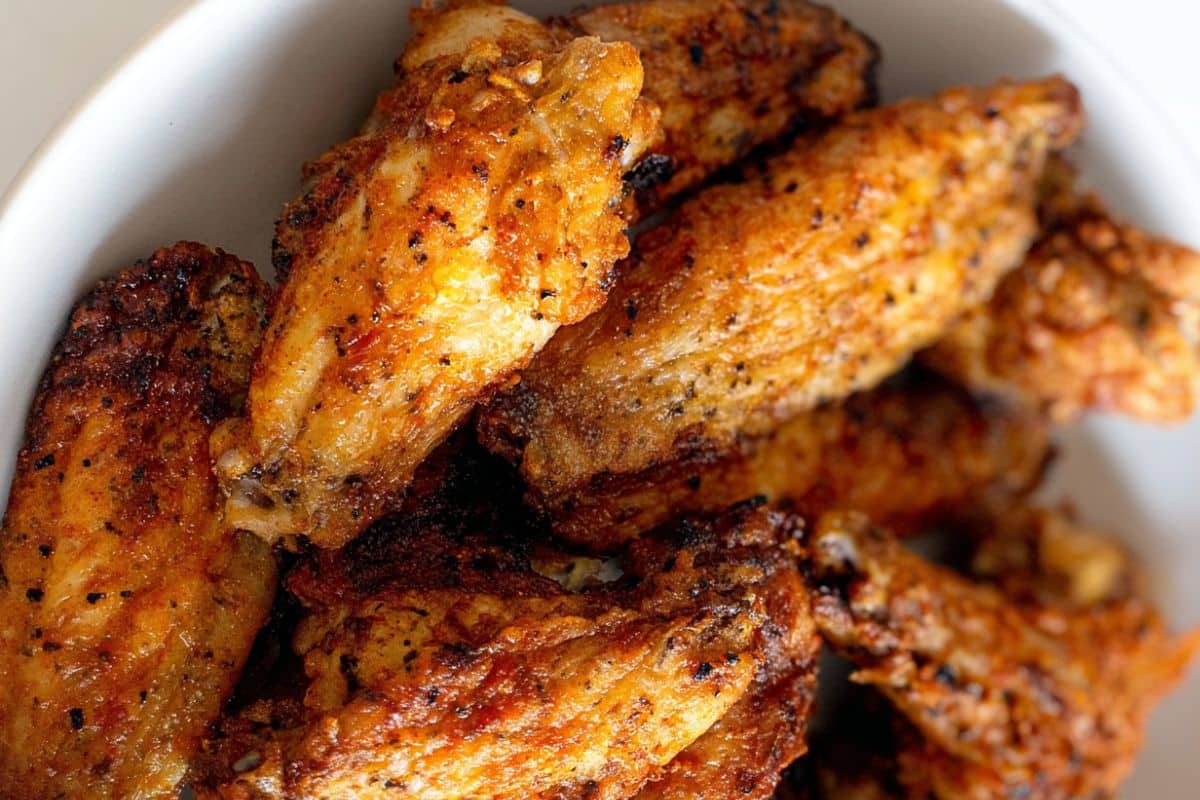
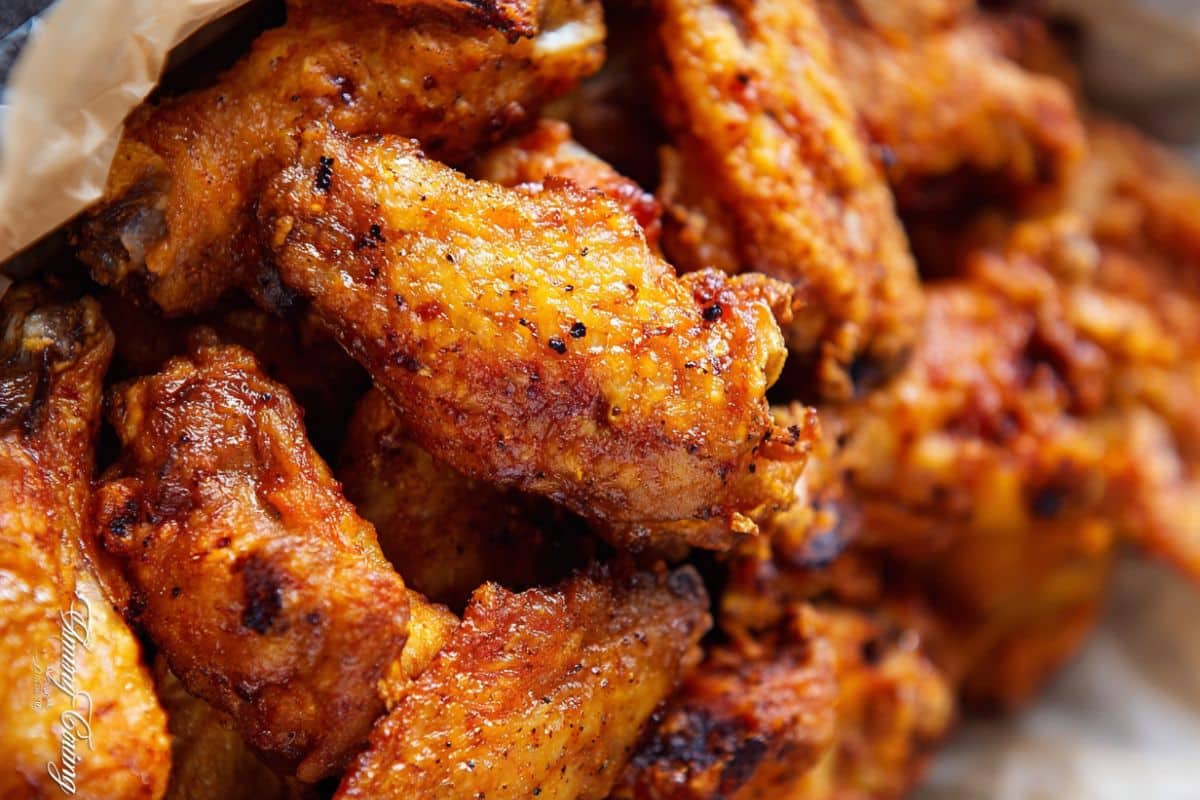
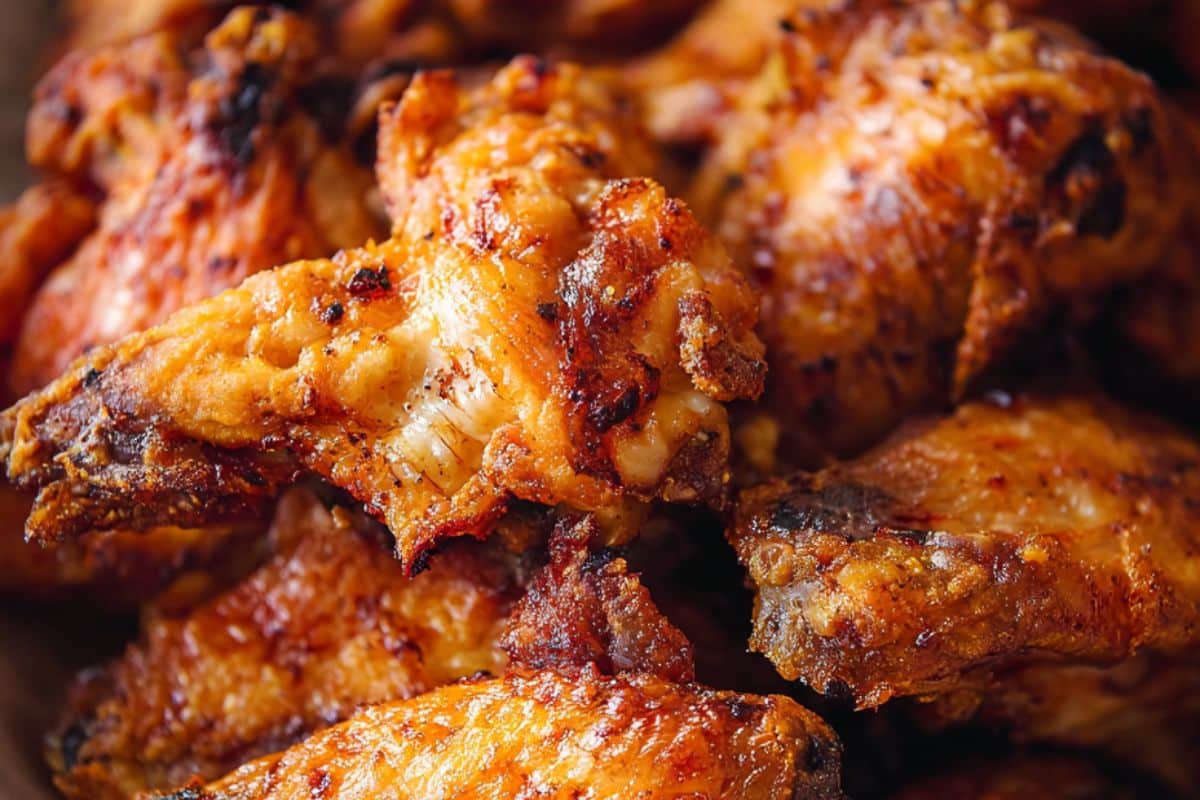
Step 8, Sauce and serve
Toss them in your favorite sauce right away. Serve them immediately. The longer they sit after saucing, the softer the skin will become. Enjoy them fresh and hot for the best results.
Recipe Success Tips
- Dry your wings as much as possible. Pat the wings with paper towels before seasoning. If you have extra time, air-dry them uncovered in the fridge. The drier the skin is going into the oven, the crispier it will be.
- Use baking powder, not baking soda. Baking soda has a strong, unpleasant taste. You need baking powder. Double-check the label before you start.
- Never skip the wire rack. It makes the difference between crispy wings and soggy ones. If you don’t have one, place the wings directly on a foil-lined pan and flip them more often. It won’t be quite as crispy, but it will still work.
- Don’t crowd the pan. Wings need space around them to crisp up properly. If they’re touching, they will steam each other. Use two baking sheets if you’re making a large batch.
- Flip once during the high-heat stage. You don’t need to fuss over them. One flip halfway through the second stage of baking is all it takes for even browning on both sides.
- Sauce right before serving. Toss the wings in sauce as soon as they come out of the oven and serve immediately. Saucing too early softens the skin quickly.
Variations and Ingredient Swaps
The best part about this recipe is how easy it is to customize. The base method stays the same each time. Only the sauce or seasoning changes. Here are some of my favorite ways to switch things up.
- Classic Buffalo
Toss the wings in a mix of hot sauce and melted butter. It’s tangy, spicy, and has the flavor everyone expects from a great wing. Use more butter for milder heat and more hot sauce for extra kick. - Honey Garlic
Combine honey, soy sauce, minced garlic, and a little butter in a small saucepan and warm it up. This one is sweet, sticky, and always a crowd favorite. It’s great for anyone who doesn’t love spicy food. - Smoky BBQ
Use your favorite store-bought BBQ sauce or make a quick homemade version. It’s smoky, sweet, and incredibly easy. Kids especially love this one. - Lemon Pepper
Skip the sauce entirely. Toss the hot wings in melted butter, fresh lemon zest, and plenty of cracked black pepper. It’s bright, buttery, and surprisingly addictive. - Garlic Parmesan
Mix in melted butter and minced garlic, finish with freshly grated parmesan. It’s rich, savory, and perfect for anyone who doesn’t like spicy wing. - Korean-Inspired
Mix gochujang, honey, soy sauce, and sesame oil for a bold, spicy-sweet glaze. Finish with sesame seeds and sliced green onions. This one always gets people asking for the recipe. - Dry Rub Only
Skip the sauce completely. Season generously with smoked paprika, cumin, cayenne, garlic powder, and brown sugar before baking. This method is great for meal prep since dry rub wings store and reheat much better than sauced ones.
What to Serve With It
Chicken wings are quite versatile when it comes to sides. Whether you’re preparing a game day spread or finishing off a weeknight dinner, here are my favorite pairings.
- Dipping Sauces
Always serve at least one dipping sauce on the side. Ranch and blue cheese are the classics. Honey mustard is great for kids. If you choose a spicy sauce for the wings, a cool, creamy dip on the side balances everything out nicely. - Celery and Carrot Sticks
This is the traditional pairing for a reason. The cool crunch cuts through the richness of the wings. It also adds something fresh and light to the plate without any extra cooking. - Coleslaw
A simple creamy coleslaw is one of my favorite sides with wings. It’s cool, crunchy, and comes together in minutes. The creaminess pairs really well with a spicy Buffalo sauce. - Potato Wedges or Fries
If you want something more filling, oven-baked potato wedges are a natural match. They bake at a similar temperature, so you can time them to finish around the same time as the wings. - Mac and Cheese
For a true comfort food spread, mac and cheese alongside wings is hard to beat. It’s rich, creamy, and makes the whole meal feel like a treat. - Simple Green Salad
If you want to keep things lighter, a crisp green salad with a sharp vinaigrette balances the richness of the wings very well. - Drinks
A cold beer is the classic choice. For a non-alcoholic option, lemonade or sparkling water with lime cuts through the fat and keeps everything refreshing.
Storage and Make-Ahead Instructions
- Storing Leftovers
Keep leftover wings in an airtight container in the fridge for up to 4 days. If possible, leave them unsauced. Sauced wings soften faster in the fridge and don’t reheat as well. - Reheating
The oven is the best way to reheat wings and keep the skin crispy. Place them on a wire rack over a baking sheet, then reheat at 350°F / 180°C for 10 to 15 minutes. Avoid the microwave; it makes the skin rubbery and soft, ruining them. - Freezing
Baked wings freeze well. First, let them cool completely. Arrange them in a single layer on a baking sheet and freeze for about an hour until solid. Then, transfer them to a freezer-safe bag or container. They last for up to 3 months. Reheat directly from frozen at 400°F / 200°C for 20 to 25 minutes, flipping once halfway through. - Make-Ahead Tips
If you’re planning for a party or game day, you have a couple of good options. You can season the wings and leave them uncovered on a wire rack in the fridge for up to 24 hours before baking. This improves the crispiness since the skin dries out more overnight. Alternatively, bake the wings fully, refrigerate them, and reheat in the oven just before serving. They won’t be quite as crispy as fresh, but they’ll still taste great. - Meal Prep
Dry rub wings are the best choice for meal prep since they reheat better than sauced wings. Bake a large batch at the start of the week, store them in the fridge, and reheat portions as needed throughout the week.
Frequently Asked Questions
- Why aren’t my baked wings crispy?
The most common reasons are excess moisture on the skin, not using a wire rack, or an oven that isn’t hot enough. Make sure to pat the wings completely dry before seasoning, always use a wire rack, and don’t shy away from high heat during the second stage of baking. These three steps work together to give you crispy skin. - Can I use frozen wings?
Yes, definitely. Just be sure to thaw them completely first. Then pat them very dry with paper towels before seasoning. Frozen wings contain a lot of extra moisture, so it’s even more important to dry them thoroughly compared to fresh wings. - Do I need to flip the wings while they bake?
Yes. Flip them once during the high-heat stage of baking. This helps both sides get an even color and crispiness. You don’t need to flip them during the low-heat stage at the beginning. - How long do baked chicken wings take?
Using the two-stage method, expect about 70 to 75 minutes total in the oven. That includes 30 minutes at low heat followed by 40 to 45 minutes at high heat. Add about 10 minutes of prep time, and you’re looking at just under 90 minutes from start to finish. - Can I make these in an air fryer?
Yes, and they turn out really crispy. Season them the same way. Cook at 380°F / 195°C for about 25 minutes, flipping halfway through. The air fryer method is faster, and the results are excellent. Just don’t overcrowd the basket; cook in batches if needed. - Is it safe to eat baking powder on chicken?
Yes, it is completely safe. Baking powder is a common ingredient used in everyday baking. The amount used in this recipe is small and perfectly fine. Use aluminum-free baking powder for the best flavor; it leaves no aftertaste on the finished wings.
Extra Crispy Baked Chicken Wings
Ingredients
Method
- Start by breaking down the whole chicken wings. Cut through the joints to get 12 flats and 12 drumlets.
- Pat each wing dry with paper towels
- Toss the wings in baking powder, salt. Mix ensuring all chickens are well coated.
- Arrange the wings in a single layer on a wire rack, leaving space between each one.
- Leave the wings uncovered in the fridge for 1 to 8 hours.
- Place a wire rack on top of a foil-lined baking sheet to catch any drippings
- Broil the wings for 5 minutes on one side, then flip them and broil for another 5 minutes. Keep the baking tray not to close to the flame ( atleast 8-inches) from direct heat. You want the skin and render some of its fat. Too much direct heat and it will brown and burn before you cana chieve crispy skin
- if your oven doesn't have the broil function ensure temps is at 500°F and 550°F (260°C to 290°C)
- Repeat this process for a total of 4 flips or until the wings are evenly browned and crispy (about 25 minutes of total cooking time - time may vary based on your oven)
- Once the wings are done, remove them from the oven.
- Toss the crispy baked wings in your preferred sauce
Check out this other party recipes
- Quick and Easy Pickled Red Onions. I love keeping a jar of these on hand at all times. They go well on tacos, grain bowls, burgers, salads, avocado toast, deviled eggs, and charcuterie boards.
- Rotel Dip with Ground Beef. The flavor combination if this rotel dip is hard to beat. Seasoned ground beef, melty Velveeta, and a can of Rotel tomatoes with green chiles make it rich, slightly spicy, and completely irresistible with a pile of tortilla chips on the side.
- The Best Creamy Spinach Artichoke Dip. This spinach artichoke dip is one of those recipes I make all the time. It’s warm, cheesy, and wonderfully creamy. It comes together in under 30 minutes.
- How to Make Buffalo Chicken Dip. There’s always that one dish at every party that goes first. People gather around it. They come back for a second scoop before finishing the first. That dish is buffalo chicken dip, and this is the recipe that makes it work every time.
- The Best Sloppy Joe Recipe To Make Tonight. The texture is everything a sloppy joe should be: saucy and hearty, with just enough thickness to stay on a bun without sliding off the plate.
- Classic Deviled Eggs Ready in 30 Minutes. These deviled eggs disappear fast at a party. It’s every time. They look good, they travel easily, and they take less than 30 minutes to prepare.