Easy, Cheesy Ham and Cheese Sliders Gone in Minutes

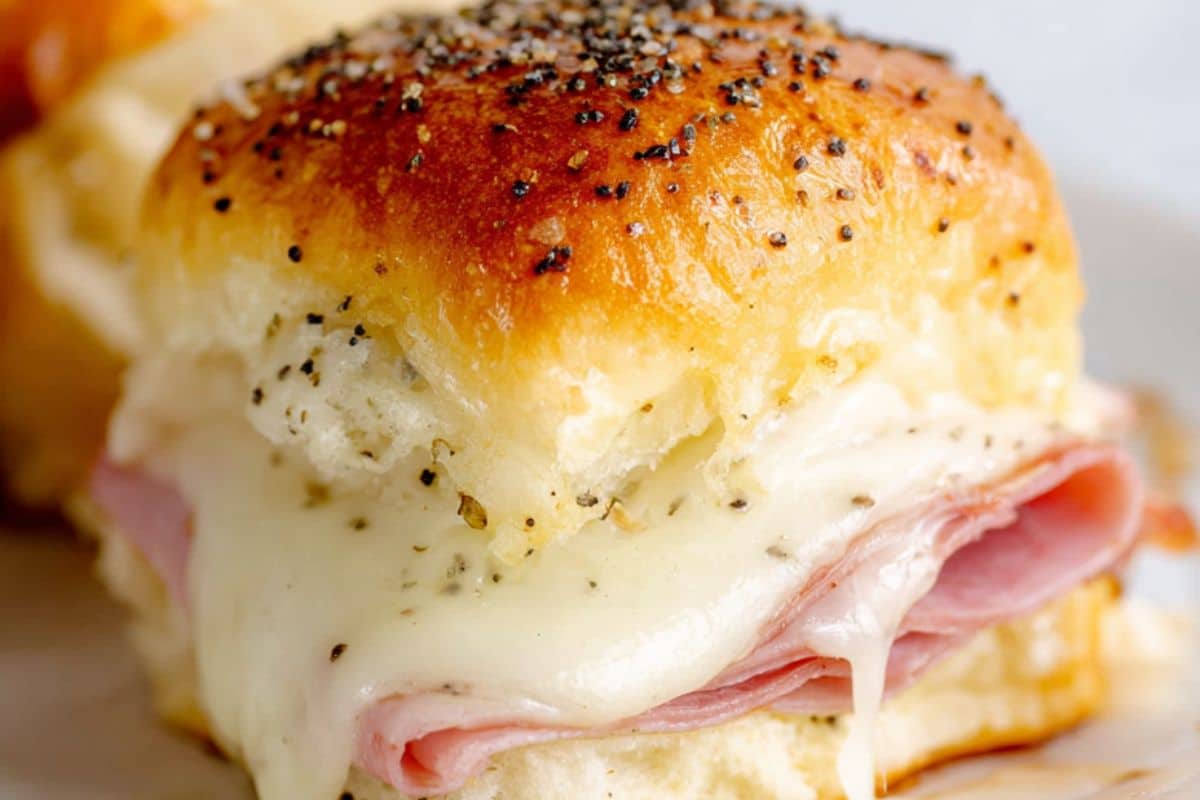
These ham and cheese sliders are the recipe I use every time I need to feed a crowd without stress. Warm, buttery rolls packed with layers of savory ham and melty cheese come out and disappear quickly.
The whole process of making these takes about 30 minutes. You get soft, pillowy rolls on the outside, gooey, melted cheese in the middle, and that delicious, buttery top that brings everything together. The texture contrast makes these completely irresistible.
I love these for game day, potlucks, holiday parties, and casual family dinners. They can be an appetizer or a main dish, served hot or warm, and they reheat the next day beautifully, if there’s any left, which there usually isn’t.
The best part? You can assemble everything the night before and just bake when you’re ready. There’s no last-minute stress or complicated steps.
If you need one dependable recipe that always earns compliments, this is it.
Can’t get enough party dip recipes? Check out this sloppy joes recipe.

Why you’ll love this recipe
- Ready in 30 minutes
Ten minutes to assemble and twenty minutes to bake. That’s all. It’s quick enough for a weeknight and impressive enough for a party. - Simple, affordable ingredients
Nothing fancy here. Just deli ham, sliced cheese, a pack of rolls, and a few pantry staples you already have. - Feeds a crowd without the fuss
One pan makes 12 sliders. If you double the recipe, you’ll have enough for a full party spread with almost no extra effort. - Make-ahead friendly
Assemble everything the night before, cover it, and refrigerate. Add the glaze right before baking. There’s no stress on the day of the event. - Endlessly customizable
Swap the ham for turkey, change the cheese, or add bacon or jalapeños. This recipe serves as a template as much as it is a recipe. - Kid-friendly and crowd-approved
Picky eaters love these sliders, and so do adults. It’s a dish that works for everyone at the table. - One pan, minimal cleanup
Everything bakes in a single dish. Line it with foil, and you hardly have to wash it. It’s a win all around.

Ingredient Notes
Here’s what you need and why each ingredient earns its place.
- Hawaiian sweet rolls (1 pack, 12)
The foundation. They are soft and slightly sweet, which works well for baking. Cut the whole block horizontally instead of separating them. Sub with: soft dinner rolls, brioche rolls, or potato rolls. - Deli ham (~12 oz)
Choose thinly sliced ham and fold each slice instead of laying it flat. Folding gives more volume and a better bite. Sub with: honey ham, Black Forest ham, leftover holiday ham, or turkey. - Swiss cheese (6–8 slices)
It melts beautifully and has a mild nutty flavor. Buy thick slices from the deli counter. Sub with: provolone (tangier), Gruyère (nuttier), cheddar (bolder), or mozzarella (stretchy). - The Butter Glaze
- Unsalted butter (4 tbsp)
This is the base of the glaze, so melt it gently without browning. - Dijon mustard (1 tbsp)
It adds a subtle tang and depth without a strong mustard taste. Don’t leave it out - Worcestershire sauce (1 tsp)
This is the secret ingredient. It adds deep umami that most people can’t identify but will notice if it’s missing. - Garlic powder (½ tsp)
It provides a savory backbone that won’t burn like fresh garlic. - Poppy seeds (1 tsp)
This is a classic slider topping that offers a subtle crunch and visual appeal.
- Unsalted butter (4 tbsp)
How to Make Ham and Cheese Sliders
Six simple steps. The whole process takes about 30 minutes.
Step 1. Preheat and prep your pan
Preheat your oven to 350°F (180°C). Lightly grease a 9×13 inch baking dish or line it with foil.
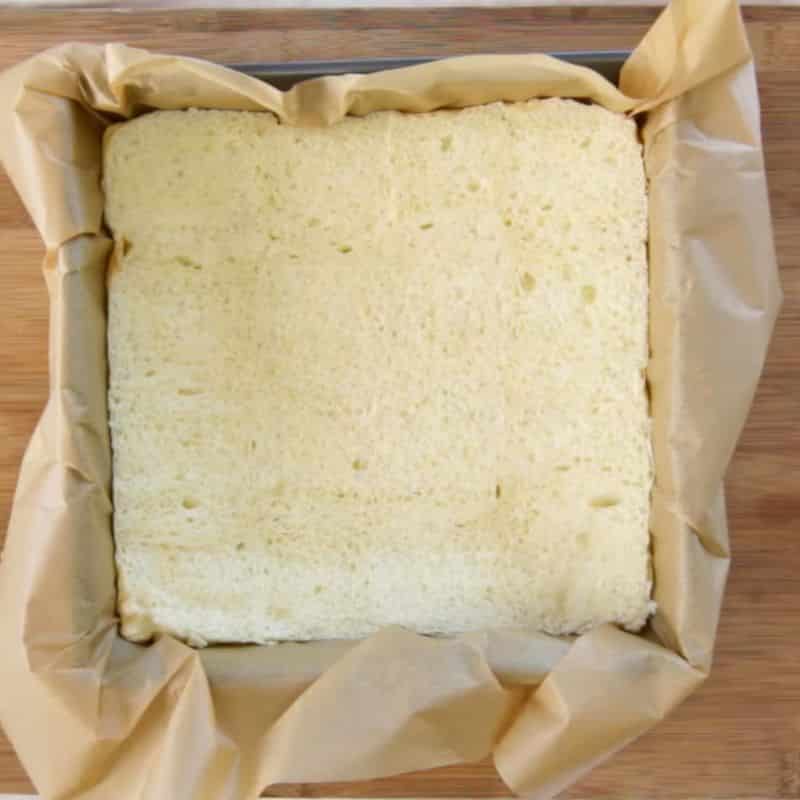
Step 2. Slice the rolls as a block
Keep the rolls connected; don’t pull them apart. Using a serrated knife, slice the entire block horizontally through the middle so you have one large top half and one large bottom half. Place the bottom half in your prepared baking dish.
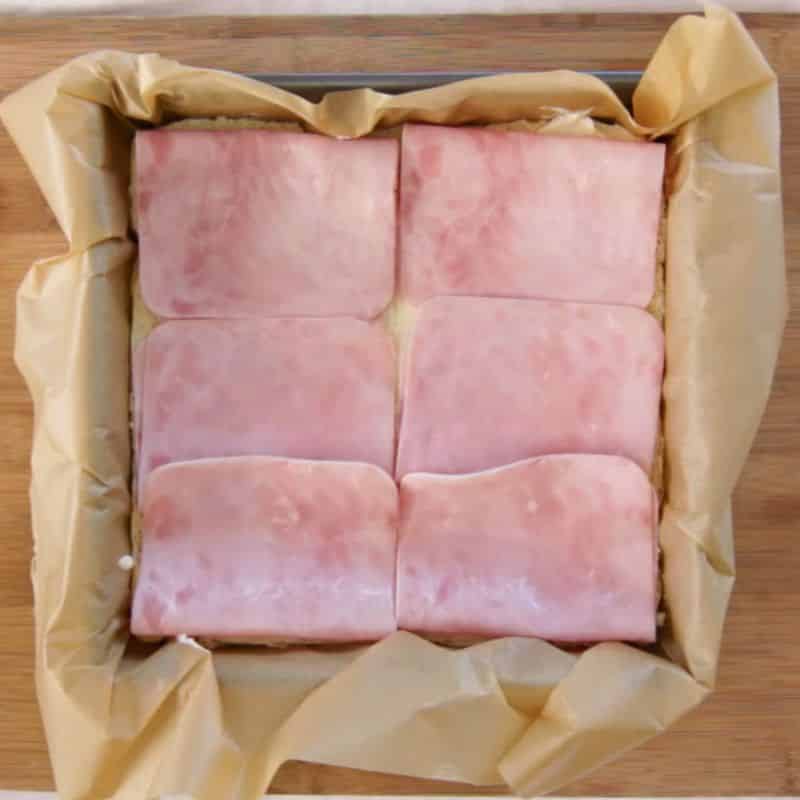
Step 3. Layer the ham and cheese
Layer the ham evenly across the bottom half of the rolls. Fold each slice rather than laying it flat; this gives you more volume and a better bite every time.
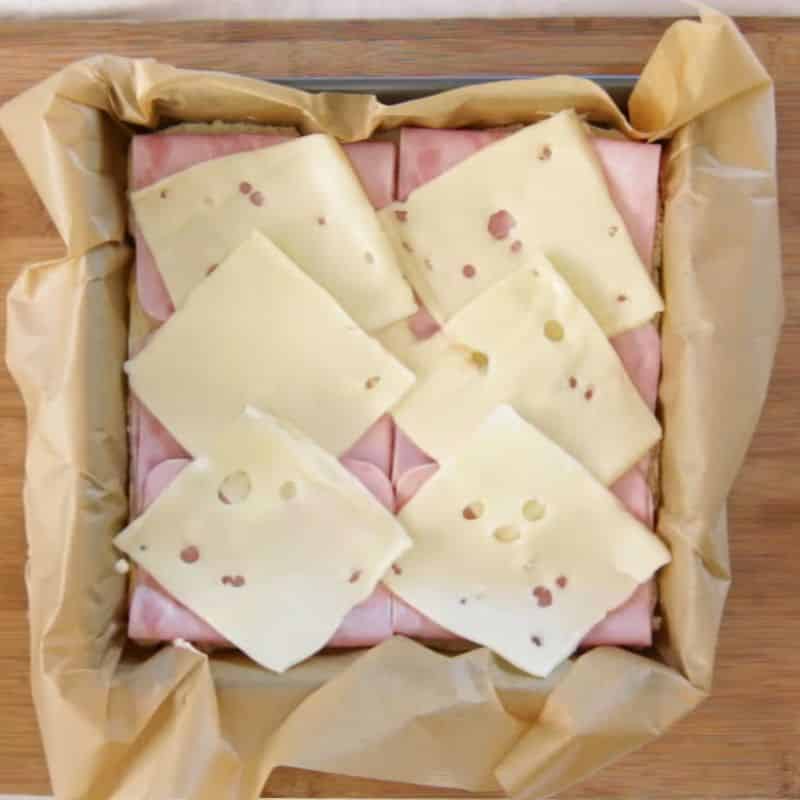
Then lay the cheese slices on top of the ham, covering it completely so every slider gets an even melt.

Step 4. Make the butter glaze
Melt the butter in a microwave-safe bowl. Whisk in the Dijon mustard, Worcestershire sauce, garlic powder, and poppy seeds (and brown sugar if using) until fully combined. Let it cool for two or three minutes before brushing; a glaze that’s too hot can make the rolls soggy.
Step 5. Top, glaze, and rest
Place the top half of the rolls back onto the cheese layer.
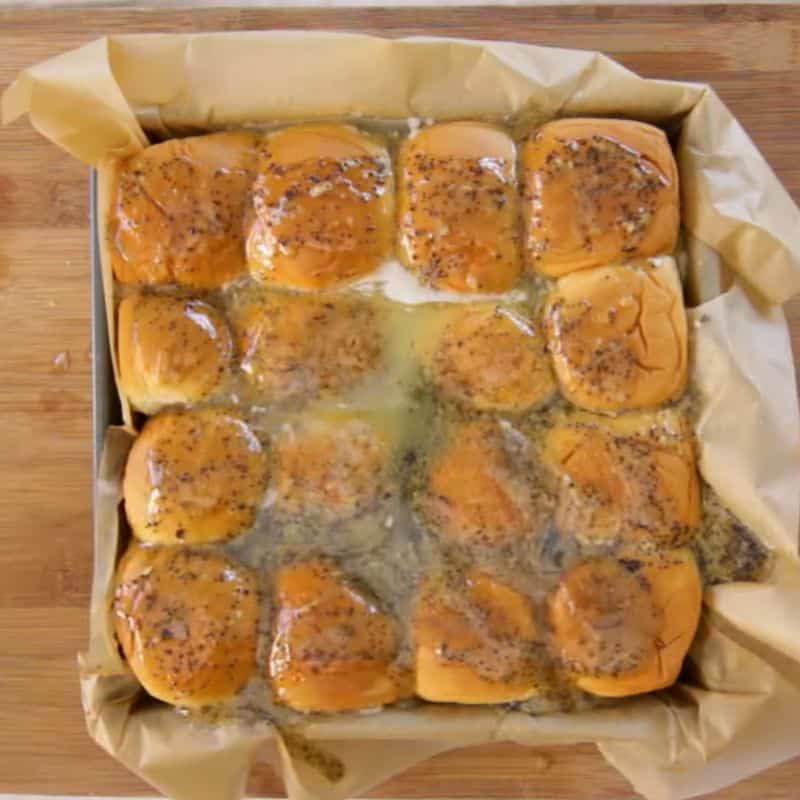
Brush the glaze generously over the entire top surface, letting it run down the sides. Use every last drop; it soaks into the rolls as it sits, and that’s where all the flavor comes from. Let the assembled sliders rest for five minutes before going into the oven.
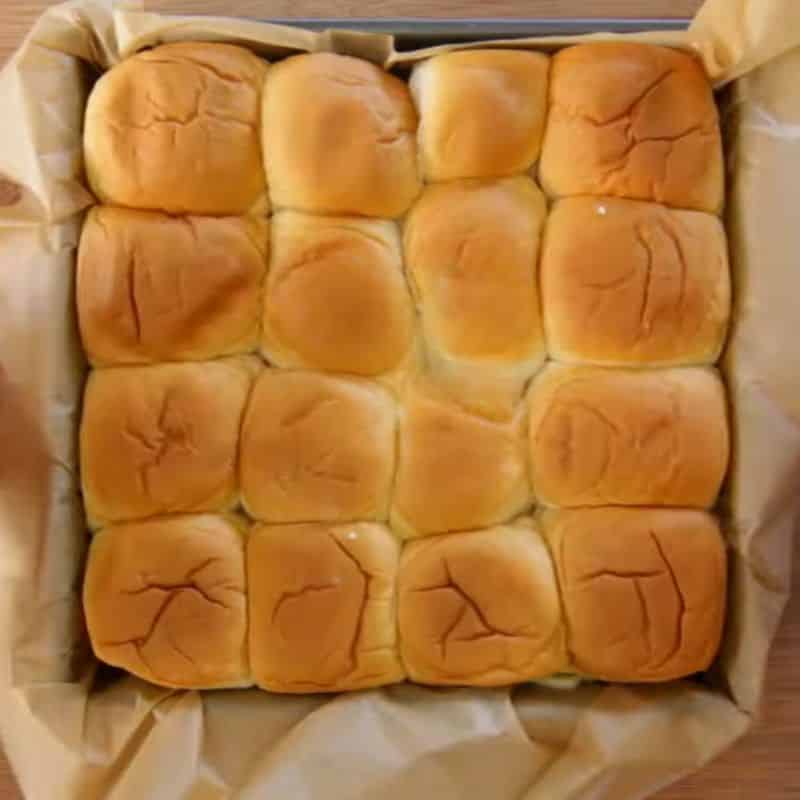
Step 6. Bake, uncover, and serve
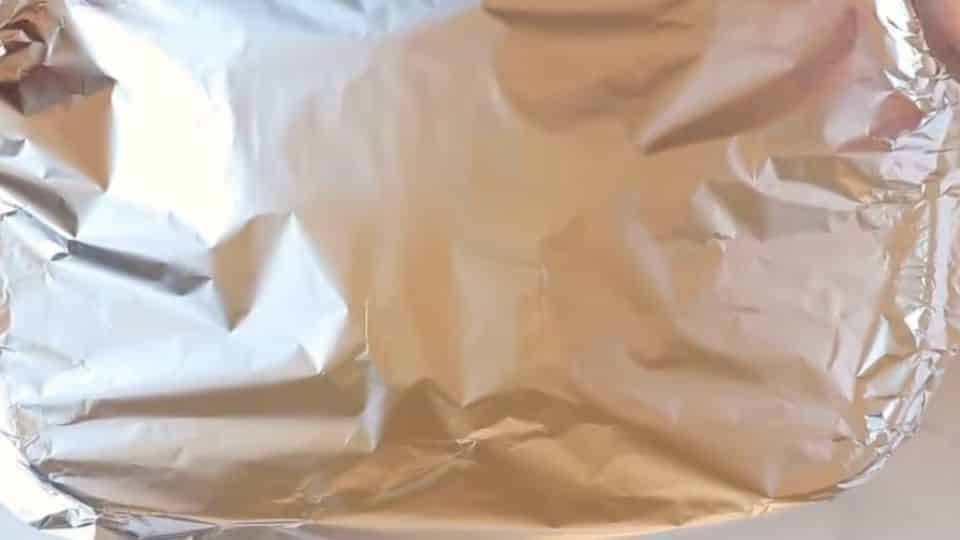
Cover the dish tightly with foil and bake for 15 minutes. Remove the foil and bake for another 5 minutes until the tops are golden brown and the cheese is fully melted. Rest for two minutes, then slice along the roll lines and serve straight from the pan.
Watch for Golden brown tops and cheese peeking out the sides; not dark brown or crispy edges. Check at 18 minutes your first time; every oven runs differently.
Serve and enjoy

Recipe Success Tips
These small details can make the difference between good sliders and those people want you to make again.
Before You Bake
- Aways use a serrated knife. Slice with a gentle sawing motion instead of applying downward pressure. A bread knife glides through cleanly and keeps the layers even.
- Fold your ham slices; don’t lay them flat. Folded ham adds volume and texture. Flat slices compress during baking, resulting in a thin, dense layer.
- Let the glaze cool before brushing. A glaze that’s too hot soaks through and makes the bottom of the rolls wet and soggy. Give it two or three minutes off the heat first.
- Rest the sliders before baking. After brushing on the glaze, wait five minutes before putting the dish in the oven. This allows the rolls to absorb the glaze throughout, not just on the surface.
During and After Baking
- Cover with foil for the first 15 minutes. The foil traps steam, keeps the rolls soft, and helps the cheese melt fully without burning the tops. Remove it for the last five minutes to achieve a golden finish.
- Watch the oven, not the clock. Check your sliders at the 18-minute mark the first time. You want golden brown tops and fully melted cheese, not dark brown or crispy edges.
- Make a double batch every single time. One pan of 12 disappears quickly. If you’re serving more than four or five people, two pans is reasonable. The second pan takes almost no extra effort.
Variations and Ingredient Swaps
The base recipe is the template. Here’s how to make it your own, with notes on how each change affects the final result.
- Turkey & cheddar
Ham → deli turkey; Swiss → sharp cheddar. This combo is milder, less rich and great for kids. - Reuben sliders
Ham → corned beef; add drained sauerkraut; glaze → Thousand Island + butter. This combo is tangy, bold, deli-style. - BLT sliders
Add crispy bacon before baking; add lettuce and tomato after baking. This combo is warm, filling with cool fresh toppings creating great contrast. - Breakfast sliders
Add slightly undercooked scrambled eggs as the first layer; Swiss → cheddar. An Indulgent brunch option. - Spicy sliders
Add pickled jalapeños; 1 tsp hot sauce in glaze; Swiss → pepper jack - Vegetarian
Ham → roasted red peppers and baby spinach; Swiss → fresh mozzarella (pat dry)
Lighter, fresher. Pat everything very dry.
What to Serve With It
The right sides turn these ham and cheese sliders from a snack into a full spread.
- Classic coleslaw, the cool crunch and mild acidity cut through the richness of the butter glaze. It is one of the best pairings for this recipe.
- Potato chips or fries, zero effort and always welcome. Kettle chips add crunch alongside the soft rolls.
- Dill pickles on the side, briny, acidic, and crunchy. Everything the sliders aren’t. This provides a perfect contrast with zero prep. Better yet, make a quick pickled red onions.
- Simple green salad, a lightly dressed salad balances the heaviness without competing. Lemon and olive oil work perfectly.
- Pasta salad, make it ahead and serve it cold. It holds well on a buffet table for hours.
- Roasted vegetables, toss whatever you have in olive oil and roast while the sliders bake. Use the same oven temperature for minimal extra effort.
- Tomato soup, the ultimate weeknight comfort pairing. A warm, tangy soup goes perfectly with cheesy, buttery sliders.
Storage and Make-Ahead Instructions
These sliders are truly friendly for meal prep. Here’s everything you need to know.
- Make Ahead (Up to 24 Hours)
Assemble up to 24 hours in advance. Cover and refrigerate. Always add the butter glaze right before baking; never before storing. Cover tightly with plastic wrap or foil and refrigerate for up to 24 hours. Don’t add the glaze yet. Take them out of the fridge 20 minutes before baking so they warm up and cook evenly. Make the glaze fresh and brush it on right before putting them in the oven. Let them rest for five minutes, then bake as directed. - Storing Leftovers
Let them cool to room temperature before storing; sealing warm sliders traps steam and makes the rolls soggy.
Store in an airtight container or wrap the pan tightly in foil. Keep them together as a block; individual sliders dry out faster. Refrigerate for up to 3 days. After that, the rolls start to dry out and the texture suffers.
Frequently Asked Questions
- Can I make ham and cheese sliders ahead of time?
Yes, you can prepare them up to 24 hours in advance. Fully assemble the sliders, cover them tightly, and refrigerate. Wait to add the butter glaze until just before baking. Take them out of the fridge 20 minutes before baking to let them warm up slightly for even cooking. Make the glaze, brush it on, let them sit for five minutes, then bake as directed.
the oven when guests arrive. - What is the best cheese for ham and cheese sliders?
Swiss is the classic choice because it melts evenly and has a mild nutty flavor that doesn’t overpower the ham. However, any good melting cheese will work. Provolone is a great alternative with a bit more tang. Gruyère makes the sliders feel more upscale. Cheddar offers a stronger flavor. Pepper jack adds some heat without extra ingredients. - Can I use regular dinner rolls instead of Hawaiian rolls?
Yes, but there is a slight trade-off. Regular dinner rolls, brioche rolls, or potato rolls all work well. The main difference is that Hawaiian rolls are a bit sweet, which balances the savory ham and buttery glaze. If you choose a simpler roll, add a teaspoon of honey or brown sugar to the butter glaze to make up for it. - How do I keep sliders warm for a party?
Leave them in the baking dish and cover loosely with foil. They stay warm and soft for 20 to 30 minutes without much effort. For longer events, set the oven to its lowest setting, around 200°F, and keep the covered dish inside; they’ll hold well for up to an hour. - How many sliders per person should I plan for?
As an appetizer 2 to 3 sliders (assuming other food is available). As a main dish 3 to 4 sliders (add a side to complete the meal). Hungry adults/game day 4 to 5 sliders per person. For Kids 1 to 2 sliders is usually enough. When in doubt, make two pans. The second pan takes almost no extra effort, and you will definitely need it. - Can I make these without Worcestershire sauce?
Yes. Worcestershire adds a rich savory flavor to the glaze, but the sliders are still tasty without it. Good substitutes include soy sauce (use half the amount since it’s saltier), balsamic vinegar (which adds depth and tang), a pinch of onion powder (to maintain the savory flavor), or simply leave it out completely.
Easy, Cheesy Ham and Cheese Sliders Gone in Minutes
Ingredients
Method
- Preheat oven to 350 degrees F and lightly grease a 9×13" baking dish.
- Using a serrated knife, slice the entire block horizontally through the middle so you have one large top half and one large bottom half. DO NOT SEPERATE THE ROLLS
- Place the bottom half in your prepared baking dish.
- Layer the ham evenly across the bottom half of the rolls. Fold each slice rather than laying it flat.
- Lay the cheese slices on top of the ham.
- Melt the butter in a microwave-safe bowl. Whisk in the Dijon mustard, Worcestershire sauce, garlic powder, and poppy seeds (and brown sugar if using) until fully combined.
- Place the top half of the rolls back onto the cheese layer
- Brush the warm glaze generously over the entire top surface, letting it run down the sides.
- Cover the dish tightly with foil and bake for 15 minutes.
- Remove the foil and bake for another 5 minutes until the tops are golden brown and the cheese is fully melted.
- Rest for two minutes, then slice along the roll lines and serve straight from the pan.
- Enjoy
Check out this other party recipes
- Rotel Dip with Ground Beef. The flavor combination if this rotel dip is hard to beat. Seasoned ground beef, melty Velveeta, and a can of Rotel tomatoes with green chiles make it rich, slightly spicy, and completely irresistible with a pile of tortilla chips on the side.
- The Best Creamy Spinach Artichoke Dip. This spinach artichoke dip is one of those recipes I make all the time. It’s warm, cheesy, and wonderfully creamy. It comes together in under 30 minutes.
- How to Make Buffalo Chicken Dip. There’s always that one dish at every party that goes first. People gather around it. They come back for a second scoop before finishing the first. That dish is buffalo chicken dip, and this is the recipe that makes it work every time.
- The Best Sloppy Joe Recipe To Make Tonight. The texture is everything a sloppy joe should be: saucy and hearty, with just enough thickness to stay on a bun without sliding off the plate.